Gas detectors are only as reliable as their last calibration. Whether you’re protecting workers in a confined space, monitoring a boiler room for carbon monoxide, or overseeing a petrochemical facility, a miscalibrated detector can either fail to warn you of a real hazard or trigger costly false alarms that erode trust in the system. Either outcome puts lives and operations at risk.
This guide walks through exactly how to calibrate a gas detector, what equipment you need, how often calibration should happen, and the best practices that safety professionals and OSHA guidelines recommend.
If you’ve already selected your detector but aren’t sure how to keep it accurate, you’re in the right place.
See our guide to choosing the right gas detector for your environment.
What Is Gas Detector Calibration And Why Does It Matter?
Calibration is the process of exposing a gas detector to a known concentration of gas and adjusting the instrument’s response to accurately reflect that concentration.
In simple terms: you tell the detector what it should be reading, and you correct it if it’s off.
Over time, sensors drift. Temperature swings, humidity, physical shock, exposure to high gas concentrations, and ordinary aging all degrade sensor accuracy.
A detector that was perfectly calibrated six months ago may now read 40 ppm when the actual concentration is 60 ppm, a dangerous underreport for a toxic gas like hydrogen sulfide (H₂S).
Environmental factors, exposure to certain gases, and normal wear and tear can all affect a detector’s accuracy without any visible warning signs on the device itself.
The stakes are significant. Improperly calibrated detectors contribute to a meaningful percentage of preventable workplace exposure incidents each year.
A gas detector that under-reports hazardous levels can fail to trigger alarms, creating life-threatening conditions, while one that over-reports causes unnecessary evacuations and breeds complacency over time.
Bump Test vs. Calibration: Understanding the Difference
Before diving into the calibration procedure, it’s important to understand that bump testing and calibration are two distinct processes, and both are necessary.
Bump Test
A bump test is a brief functional check. You expose the detector to a known concentration of gas for a short period (typically 15–20 seconds) to confirm that the sensors respond and the alarms activate.
It answers one question: Is this detector working? It does not confirm whether the readings are accurate.
Calibration
A full calibration is a quantitative process that adjusts the sensor’s output to match a certified, known concentration.
It answers a different question: Is this detector accurate? A calibration corrects for sensor drift, the gradual degradation of sensor performance that can cause readings to diverge from actual gas concentrations over time.
A useful analogy: a bump test is like tapping a car’s speedometer to see if the needle moves. Calibration is like driving a measured mile to confirm the needle is reading the correct speed.
Both are required
A passed bump test does not replace calibration, and a recently calibrated detector should still be bump-tested before each day’s use in high-risk environments.
Types of Calibration: Zero and Span
A full gas detector calibration involves two distinct steps, commonly called zero calibration and span calibration. Together, they form what’s known as a two-point calibration.
Zero Calibration
Zero calibration establishes a clean baseline. The detector is exposed to zero gas, typically pure nitrogen or clean ambient air that contains no target gas, and the instrument is adjusted to read zero. This ensures the detector isn’t registering a concentration when none is present.
Important
Perform zero calibration in a truly clean-air environment, away from exhaust fumes, chemical vapors, or any source of the target gas.
Zeroing in contaminated air introduces an error that propagates through every subsequent reading.
Span Calibration
Span calibration uses a certified calibration gas at a known concentration to set the upper accuracy point.
The standard approach is to apply a gas concentration that falls in the 40–60% range of the sensor’s full detection range.
For example, a sensor with a 0–100 ppm detection range would typically use a 40–60 ppm calibration gas.
This two-point approach (zero + span) corrects the sensor’s accuracy across its entire detection range, since most gas sensors produce a linear output.
What You Need Before You Start
Gather the following before beginning any calibration procedure:
The detector’s manufacturer’s manual
Calibration procedures vary by model; always follow model-specific instructions.
Certified calibration gas
Must match the target gas(es) your detector monitors and must be NIST-traceable with an unexpired certification date.
Appropriate regulator
Match the flow rate to your detector type (fixed-flow regulators at 0.5–1.0 L/min for diffusion-based units; demand-flow regulators for pump-equipped units).
Calibration cap or tubing
To deliver gas directly to the sensor inlet.
A clean-air environment
Well-ventilated, free of the target gas and interfering vapors.
Calibration log or docking station
For documentation.
Critical note on calibration gas
Always use the specific gas blend and concentration recommended by your detector’s manufacturer.
Using the wrong gas, an impure blend, or an expired cylinder can produce calibration errors that are worse than no calibration at all.
Check the expiration date on every cylinder before use. Reactive gases including H₂S degrade in cylinders over time and cannot be assumed to be at labeled concentration past their certified date.
How to Calibrate a Gas Detector: Step-by-Step
The following procedure covers the standard approach for portable gas detectors. Fixed detectors follow similar principles but may require a certified technician and have additional site-specific steps.
Step 1: Pre-Calibration Inspection
Before exposing your detector to calibration gas, inspect the unit.
- Check battery level, as a low battery can affect sensor readings and cause calibration errors.
- Inspect the sensor inlet for debris, dust, or contamination and clean as needed.
- Confirm the detector is powering on correctly and displaying a stable reading in clean air.
- Note that the ambient temperature and humidity calibration should ideally be performed in conditions similar to the actual operating environment, since sensor sensitivity can vary with temperature and humidity.
Step 2: Allow the Detector to Warm Up
Power on the detector and allow it to warm up fully in clean air before beginning calibration. Most portable units require 30–60 seconds, but some electrochemical sensors require longer warm-up periods. Refer to the manufacturer’s manual for the recommended warm-up time.
Step 3: Perform Zero Calibration
With the detector running in a clean-air environment (or connected to a certified zero gas cylinder):
- Enter the detector’s calibration mode as described in the manufacturer’s manual
- Initiate the zero calibration function
- Wait for the reading to stabilize at zero
- Confirm and save the zero point
If using zero gas from a cylinder rather than ambient air, apply it at the manufacturer-specified flow rate and wait for the reading to stabilize before confirming.
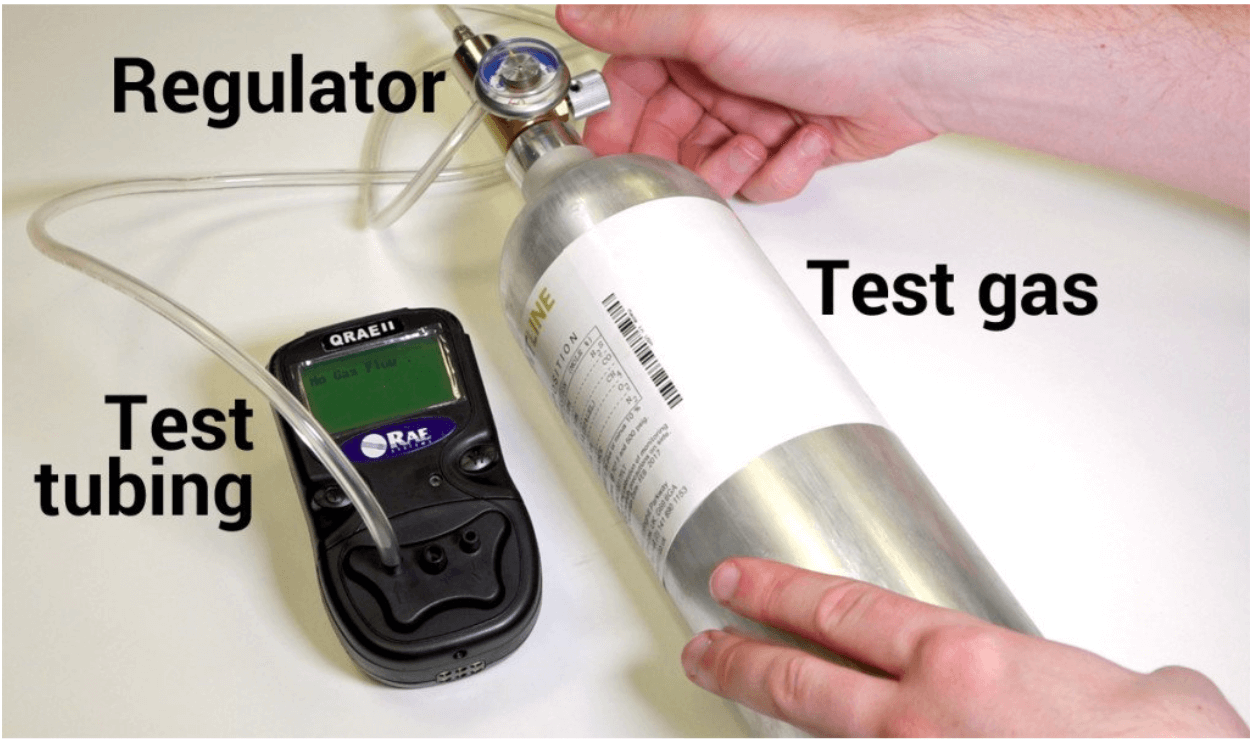
Step 4: Connect the Calibration Gas
Attach the calibration cap to the detector’s sensor inlet. Connect the calibration gas cylinder through the appropriate regulator and verify that.
- The gas concentration and blend match the detector’s requirements.
- The cylinder has not expired.
- The flow rate matches the manufacturer’s specification (typically 0.5–1.0 L/min for diffusion sensors).
Step 5: Perform Span Calibration
- Open the calibration gas flow and apply gas to the detector inlet.
- Enter span calibration mode (if not already active) and enter the known concentration value from the calibration gas certificate when prompted.
- Allow the sensor reading to stabilize. This typically takes 1–2 minutes, longer than a bump test
- Confirm and save the span calibration value.
- Close the gas flow.
Step 6: Verify and Post-Calibration Check
After saving calibration values, perform a verification step.
- Confirm the zero reading returns to zero in clean air.
- Re-expose the sensor to the calibration gas and verify it reads within the manufacturer’s acceptable tolerance (commonly ±5–10% of the true value).
- Test alarms at the detector’s programmed alarm thresholds if the device allows.
If the detector fails to read within acceptable limits after calibration, remove it from service and contact the manufacturer or a certified calibration service provider.
Step 7: Document Everything
OSHA recommends developing standard procedures for gas detector calibration that include formal documentation. Record the following for every calibration.
- Date and time of calibration.
- Detector model and serial number.
- Calibration gas used (gas type, concentration, lot number, expiration date).
- Zero and span readings before and after calibration.
- Pass/fail result.
- Name of the technician performing calibration.
- Next calibration due date.
Docking stations can automate this logging and generate audit-ready records, particularly valuable in regulated industries like confined space entry, petrochemicals, wastewater, and mining.
How Often Should You Calibrate a Gas Detector?
There is no single universal answer, but the following framework covers most situations.
| Procedure | Recommended Frequency |
|---|---|
| Bump test | Before each day’s use (daily minimum) |
| Full calibration | At minimum every 6 months; monthly recommended as a baseline |
| After any of the trigger events below | Immediately |
Calibrate immediately (regardless of schedule) after any of the following:
- A failed bump test.
- Exposure to very high gas concentrations or sensor-poisoning substances (silicones, phosphates, lead).
- Physical impact or drop.
- Extended storage.
- Extreme temperature or humidity exposure.
- Sensor replacement.
- Erratic, slow, or inconsistent readings.
- Any safety incident or near-miss involving gas hazards.
Many manufacturers, including industry leaders like mPower, recommend calibrating at intervals no longer than 6 months, with higher-frequency calibration for detectors used in particularly harsh or high-risk environments.
Higher-quality sensors with lower drift rates may tolerate longer calibration intervals, while lower-quality sensors may require more frequent correction.
Regulatory note
OSHA does not prescribe a specific calibration frequency by regulation, but its Safety and Health Information Bulletin (SHIB) emphasizes verifying detector accuracy before each day’s use and recommends employers develop and document standard calibration procedures.
MSHA, ATEX, and many industry-specific standards may impose additional requirements depending on your sector.
Common Gas Detector Calibration Mistakes to Avoid
Even experienced technicians run into preventable errors. Watch out for these.
Using expired calibration gas
Reactive gases, especially H₂S, degrade inside cylinders over time. An expired cylinder may contain a lower concentration than labeled, which will cause the detector to be calibrated incorrectly.
Zeroing in on contaminated air
If background levels of the target gas are present in your “clean air” environment, the zero baseline will be offset, introducing error into all subsequent readings.
Using the wrong regulator
Fixed-flow and demand-flow regulators are not interchangeable. A mismatched regulator delivers gas at the wrong flow rate, preventing proper sensor response during calibration.
Skipping the warm-up period
Sensors that haven’t stabilized can produce variable readings during calibration, resulting in an inaccurate span value.
Not documenting calibrations
Regulators and insurers may require calibration records during incident investigations or audits. Undocumented calibrations offer no legal or operational protection.
Repeating DIY calibration after two failures
If a detector fails calibration twice, it should be sent to a certified professional or manufacturer service center rather than attempting repeated field adjustments.
Fixed vs. Portable Gas Detectors: Calibration Differences
The calibration principles above apply to both portable and fixed detectors, but there are some important practical differences.
Portable detectors are typically calibrated by the user or a site safety officer using a portable calibration kit. Because they move between environments and are handled frequently, they are more susceptible to physical damage and contamination, making regular bump testing and calibration especially important.
Fixed gas detection systems are permanently installed and may be harder to access for manual calibration and gas delivery. Many fixed systems use automated calibration gas delivery through tubing connected to cylinders, or support remote calibration initiated from a control panel. Fixed systems often require a certified technician for calibration and may have stricter documentation requirements under site safety management systems.
Learn more about fixed vs. portable gas detection systems
When to Use a Professional Calibration Service
While bump testing and routine calibration can be performed in-house by trained personnel, there are situations where a professional calibration service is the right call:
- The detector has failed calibration multiple times.
- The sensor is aging or out of specification and may need replacement.
- Your regulatory environment requires third-party calibration records (e.g., for ATEX or certain MSHA certifications).
- You lack access to the correct calibration gas or equipment.
- The detector has been involved in a safety incident, and its integrity needs independent verification.
Professional calibration services return the detector with a formal certificate of calibration, which can be essential for compliance audits and incident investigations.
Calibration Best Practices Summary
To keep your gas detection program on track, follow these core best practices:
- Always read the manufacturer’s manual, calibration procedures, gas types, flow rates, and tolerance limits vary by model.
- Bump test before every day’s use in any environment where gas hazards exist.
- Calibrate fully at least every 6 months at a minimum, or more frequently in demanding environments.
- Use only NIST-traceable, unexpired calibration gas that matches your detector’s target gases.
- Zero the detector in genuinely clean air remote from exhaust, chemicals, or any source of the target gas.
- Use the correct regulator and flow rate for your detector type.
- Allow the sensor to stabilize before confirming calibration values.
- Document every calibration with date, gas lot, technician, and result.
- Remove from service immediately any detector that fails calibration or bump test.
Final Thoughts
A gas detector that isn’t properly calibrated isn’t a safety device; it’s a false sense of security. Calibration is not a bureaucratic checkbox; it is the process that connects your detector’s electronic readings to real-world gas concentrations and, ultimately, to real-world safety outcomes.
By following a consistent calibration schedule, using the right equipment, and keeping thorough records, you give your gas detection system the foundation it needs to protect the people who depend on it.
Have questions about calibrating a specific type of detector? Leave a comment below or contact us. We’re happy to help.