
Your portable gas monitor spends its working life in one of the dirtiest environments imaginable, clipped to your collar in confined spaces, dusty plants, and greasy mechanical rooms.
And because it has to sit inches from your nose and mouth to do its job, every bit of grime, sweat, and bacteria it collects ends up right in your breathing zone.
So it needs regular cleaning. The problem? The obvious solution, grabbing a disinfecting wipe like you would for any other piece of shared equipment, is one of the fastest ways to compromise your monitor’s sensors and trigger false readings.
After years of working with gas detection systems in industrial environments, I’ve seen perfectly good monitors pulled from service because someone cleaned them the wrong way.
This guide covers how to clean portable gas monitors properly: what to use, what to avoid, and how to verify your instrument still reads accurately afterward.
Why Gas Monitor Placement Makes Cleaning a Health Issue
Portable gas monitors only protect you if they sample the air you actually breathe. That’s why they’re worn in the breathing zone, which OSHA defines as “a hemisphere forward of the shoulders within a radius of approximately six to nine inches” around the nose and mouth.
In practice, that means clipping the monitor to
- A shirt collar
- A lapel
- An outside breast pocket
These positions keep the instrument sampling representative air, and they keep the display visible and important in high-noise environments where you might not hear an audible alarm and need to rely on visual or vibration alerts.
But here’s the trade-off: anything living on the surface of that monitor, dirt, oil, chemical residue, or bacteria from shared instrument pools is now sitting six to nine inches from your face for an entire shift.
On sites where monitors are shared between workers across shifts, hygiene becomes a genuine occupational health concern, not just an equipment care issue.
Regular cleaning is non-negotiable. Cleaning it correctly is what most workers get wrong.
Why You Shouldn’t Use Regular Disinfectants on a Gas Detector
Here’s the counterintuitive part: the chemicals in standard disinfecting wipes and sprays are often the very compounds your monitor is designed to detect.
The rubber housings, plastic casings, and sensor membranes on a gas monitor are slightly porous. When you wipe the instrument down with a disinfectant, those materials absorb some of the chemical alcohols, chlorine compounds, and quaternary ammonium solutions and then slowly off-gas them over the following minutes or hours.
This creates two serious problems:
False alarms and phantom readings
Sensors, particularly PID and some electrochemical sensors, respond to the absorbed chemicals as they off-gas.
You’ll see readings with no actual hazard present, which erodes trust in the instrument. And a workforce that stops trusting its gas monitors is a workforce in danger.
Unreliable zeroing
You can’t simply zero the instrument and move on, because the off-gassing continues at an unpredictable rate.
The effect is temporary, but the length of time you’d need to wait before zeroing varies by chemical, temperature, and how saturated the materials became. That variability leaves far too much room for error on a life-safety device.
Worse still, some cleaning chemicals don’t just cause temporary interference; they cause permanent sensor damage. More on that below.
How to Clean a Portable Gas Monitor: Step by Step
Proper cleaning protects two things at once: the worker wearing the instrument and the sensitive electrochemical, catalytic bead, and infrared sensors inside it.
Step 1: Check the manufacturer’s manual first
Always verify the cleaning procedure in the user manual for your specific instrument. Manufacturers like Honeywell, Dräger, Industrial Scientific, and MSA publish model-specific cleaning guidance, and some instruments have unique requirements around sensor ports, pump inlets, or IP-rated seals. When the manual conflicts with general advice, the manual wins.
Step 2: Switch the monitor off
Power the instrument down completely before cleaning. This prevents the sensors from responding to cleaning agents mid-wipe and protects the electronics if any moisture finds its way inside.
Step 3: Start with a dry, soft cloth
Unless the manufacturer instructs otherwise, your default cleaning tool is a dry, soft, lint-free rag. For everyday dust and light grime, this is often all you need. Wipe down the housing, display, clip, and around (but not into) the sensor ports.
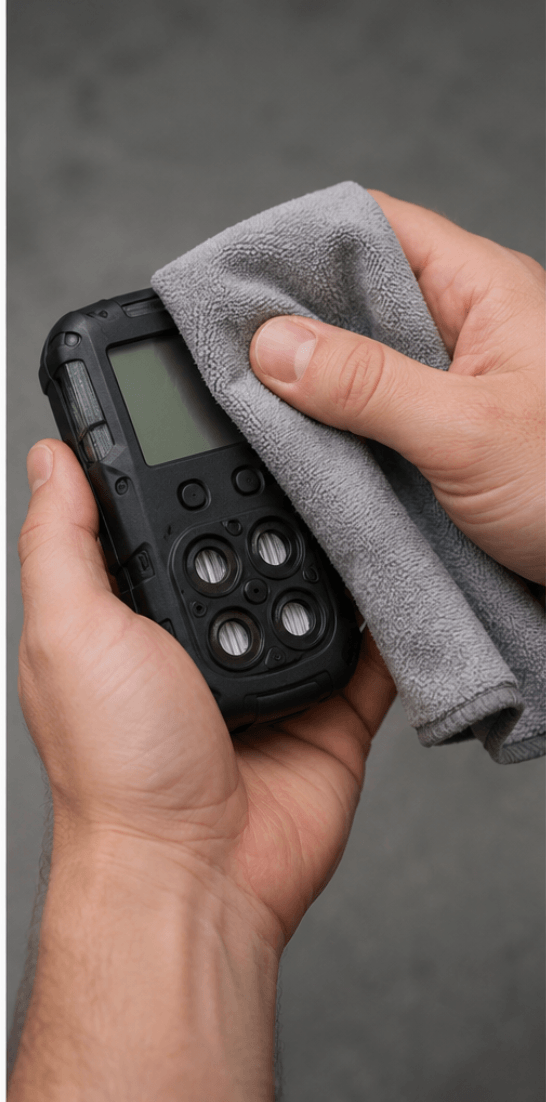
Step 4: Use mild soap and water for heavier soiling
If dry wiping isn’t enough, lightly moisten a soft cloth with a solution of mild soap and water. The key word is lightly.
The cloth should be damp, never dripping. Wipe the exterior surfaces, then follow with a cloth dampened with clean water to remove soap residue.
Be extremely careful not to introduce liquid into the following:
- Sensor ports and membranes
- Pump inlets (on pumped/aspirated monitors)
- Speaker and alarm openings
- Charging contacts and data ports
Step 5: Let it dry completely before powering on
Do not switch the monitor back on until it is completely dry. Powering up a damp instrument risks short circuits and can pull moisture toward the sensors.
Air-dry at room temperature; never use compressed air, heaters, or direct sunlight to speed things up, as heat can degrade sensor electrolytes.
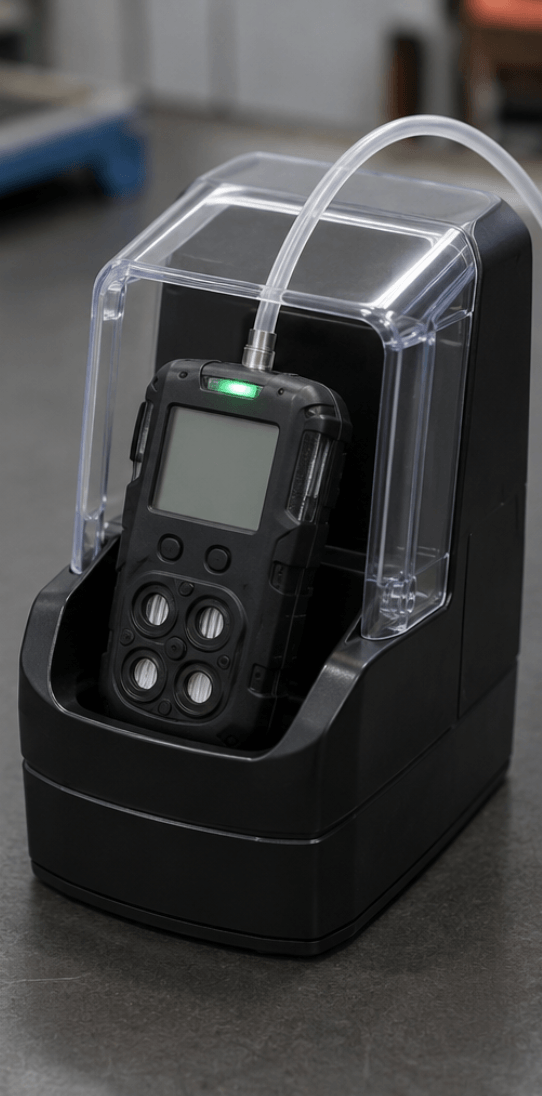
Step 6: Bump test before returning to service
After any cleaning, perform a bump test before the instrument goes back into service. A quick functional check with known concentration gas confirms the sensors still respond correctly and the alarms activate.
If the bump test fails, perform a full calibration, and if readings still drift, the instrument needs professional attention.
Cleaning Agents to Avoid (And What They Do to Sensors)
Not all “gentle” cleaners are safe for gas detection instruments. Keep these away from your monitors:
Alcohol-based products (isopropyl wipes, hand sanitizer residue)
Alcohols cause a temporary response on several sensor types, particularly PID sensors and some electrochemical cells, leading to false alarms and unstable baselines.
If alcohol-based cleaning is unavoidable on your site, expect to wait an extended, unpredictable period before the instrument stabilizes enough to zero accurately.
Chlorine-based cleaners (bleach solutions, chlorinated wipes)
Chlorine compounds can cause permanent loss of sensitivity in catalytic bead (LEL) sensors and some electrochemical sensors. This is sensor poisoning; the damage doesn’t recover, and the sensor must be replaced.
Silicone-containing products (many polishes, protectants, and some lotions)
Silicones are among the most notorious LEL sensor poisons in the industry. Even trace silicone vapor coats the catalytic bead and permanently kills its ability to respond to combustible gas, often without any obvious warning. A poisoned LEL sensor can read zero in an explosive atmosphere.
Solvents and harsh cleansers (acetone, degreasers, ammonia-based cleaners)
These attack the plastics, seals, and sensor membranes and can permanently damage the sensing elements themselves.
The danger with sensor poisoning is that it’s silent. The monitor looks fine, powers on, and displays readings.
It just no longer responds to gas. This is exactly why bump testing after cleaning (and before every day’s use) matters so much.
Quick Reference: Do’s and Don’ts
| Do | Don’t |
|---|---|
| Check the instrument manual first | Assume all monitors clean the same way |
| Switch the monitor off before cleaning | Clean a powered-on instrument |
| Use a dry, soft, lint-free cloth | Use disinfecting wipes or sprays |
| Use mild soap and a lightly damp cloth if needed | Soak the instrument or let liquid pool |
| Air-dry completely before powering on | Use heat or compressed air to dry |
| Bump test after cleaning | Return a monitor to service, unverified. |
| Keep silicones and chlorine away entirely | Use bleach, solvents, or polishes |
What About Disinfecting Shared Monitors?
Shared instrument pools raise a fair question: if disinfecting wipes are off the table, how do you handle hygiene between users?
A few practical approaches:
- Assign monitors to individuals where budget allows. Personal hygiene eliminates the cross-contamination problem and improves accountability for care and charging.
- Clean with mild soap and water between users. Done properly, soap-and-water cleaning removes the oils and grime that harbor bacteria without introducing sensor-poisoning chemicals.
- Consult the manufacturer for approved disinfection procedures. Some manufacturers have published instrument-specific hygiene guidance (many did during the COVID-19 era) identifying which agents are tolerable for their specific sensor configurations and how long to wait before zeroing. Follow their procedure exactly; don’t generalize it to other brands or models.
Frequently Asked Questions
Can I use alcohol wipes on my gas detector?
Avoid them. Alcohol absorbs into the housing and membranes, then off-gasses and triggers temporary sensor responses and false alarms.
The waiting period before the instrument stabilizes is unpredictable, which makes accurate zeroing unreliable.
How often should I clean my portable gas monitor?
Wipe it down with a dry cloth whenever it’s visibly dirty and as part of routine end-of-shift care. Deeper soap-and-water cleaning depends on the environment; dusty, oily, or shared-use conditions call for more frequent attention.
Why does my gas monitor alarm after cleaning?
Most likely, the cleaning agent has been absorbed into the housing or sensor membrane and is off-gassing. If you used alcohol-based products, the response is usually temporary.
If you used chlorine or silicone-containing products, the sensor may be permanently poisoned; perform a bump test to verify and recalibrate or replace the sensor if it fails.
Do I need to recalibrate after cleaning?
A full calibration isn’t automatically required, but a bump test is strongly recommended after every cleaning. If the bump test fails, calibrate. If calibration fails, the sensor likely needs replacement.
Can I rinse my gas monitor under running water?
No, even monitors with high IP ratings shouldn’t be held under running water for cleaning. Excess liquid can enter sensor ports and pump inlets. A lightly dampened cloth is the maximum moisture the instrument should see.
Final Thoughts
Cleaning a portable gas monitor is simple once you know the rules: read the manual first, power off, use a dry cloth by default, use mild soap and water when needed, dry completely, and perform a bump test before service.
The instruments that fail early aren’t usually the ones that got dirty. They’re the ones that got “cleaned” with disinfecting wipes, bleach, or silicone polish.
Your gas monitor is the last line of defense between you and an invisible hazard. Treat its sensors with the same care you’d expect from them.