If you work in an environment where gas hazards are a real risk, your gas detector is only as reliable as your last verification.
That’s where the bump test comes in, and understanding it could make the difference between a detector that saves your life and one that fails silently.
What Is a Bump Test?
A bump test (also called a functional test or challenge test) is a quick, qualitative check performed on a portable gas detector to confirm that its sensors respond to gas and that its alarms activate correctly.
During a bump test, you briefly expose the detector to a known concentration of target gas, typically a calibration gas mixture in a small cylinder, and confirm that.
- The sensor reads a gas concentration above zero.
- The alarm (audible, visual, or vibration) triggers as expected.
Crucially, a bump test does not verify that the reading is accurate to a specific value. It simply confirms the detector is alive and responding. Think of it as a go/no-go check, not a precision measurement.
Bump Test vs. Calibration: What’s the Difference?
This is one of the most common points of confusion in gas detection, so it’s worth addressing directly.
| Adjust the sensor to read accurately | Full Calibration | |
|---|---|---|
| Purpose | Confirm sensor response and alarm function | Adjust sensor to read accurately |
| Time required | 30–60 seconds | Several minutes |
| Result | Pass/fail | Corrected sensor output |
| Adjusts the sensor? | No | Yes |
| Frequency | Before each use (recommended) | Per manufacturer schedule or as needed |
A bump test tells you the detector works. Calibration tells you the detector reads correctly. You need both, but they serve different purposes in your maintenance program.
Why Are Bump Tests Important?
Gas detectors are electrochemical or catalytic instruments. Over time, sensors can degrade, become poisoned by contaminants, or simply fail without any visible warning to the user.
Here’s what a bump test protects against.
Sensor poisoning
Certain chemicals, silicones, heavy metals, and chlorinated compounds can coat a catalytic bead or electrochemical cell and suppress its response.
A detector that has been exposed to these agents may display a zero reading even in a hazardous atmosphere.
Sensor end-of-life failure
Sensors don’t last forever. Electrochemical oxygen sensors, for example, typically last 1–3 years. When they fail, they can do so silently. A bump test catches this before the detector enters service.
Blocked or clogged inlet
Dust, paint, or debris can physically block the gas inlet port. Without exposing the sensor to gas, you’d never know.
Electronics or alarm failure
A bump test exercises the alarm circuit, confirming the buzzer, LED, and/or vibrator actually function. A dead alarm battery or a failed buzzer is a critical hidden defect.
In short, a gas detector that doesn’t alarm is worse than no detector at all, because it gives the worker a false sense of security.
How to Perform a Bump Test: Step-by-Step
The exact procedure varies slightly by instrument and manufacturer, but the general process is consistent across most portable multi-gas detectors (such as Industrial Scientific, Honeywell, BW Technologies, or MSA units).
What You’ll Need
- Your gas detector (fully charged).
- An appropriate calibration gas cylinder containing the target gas(es) at a known concentration above the alarm setpoint
- A regulator (demand-flow or fixed-flow, as required by your instrument)
- A bump test cap or tubing to direct gas to the sensor inlet
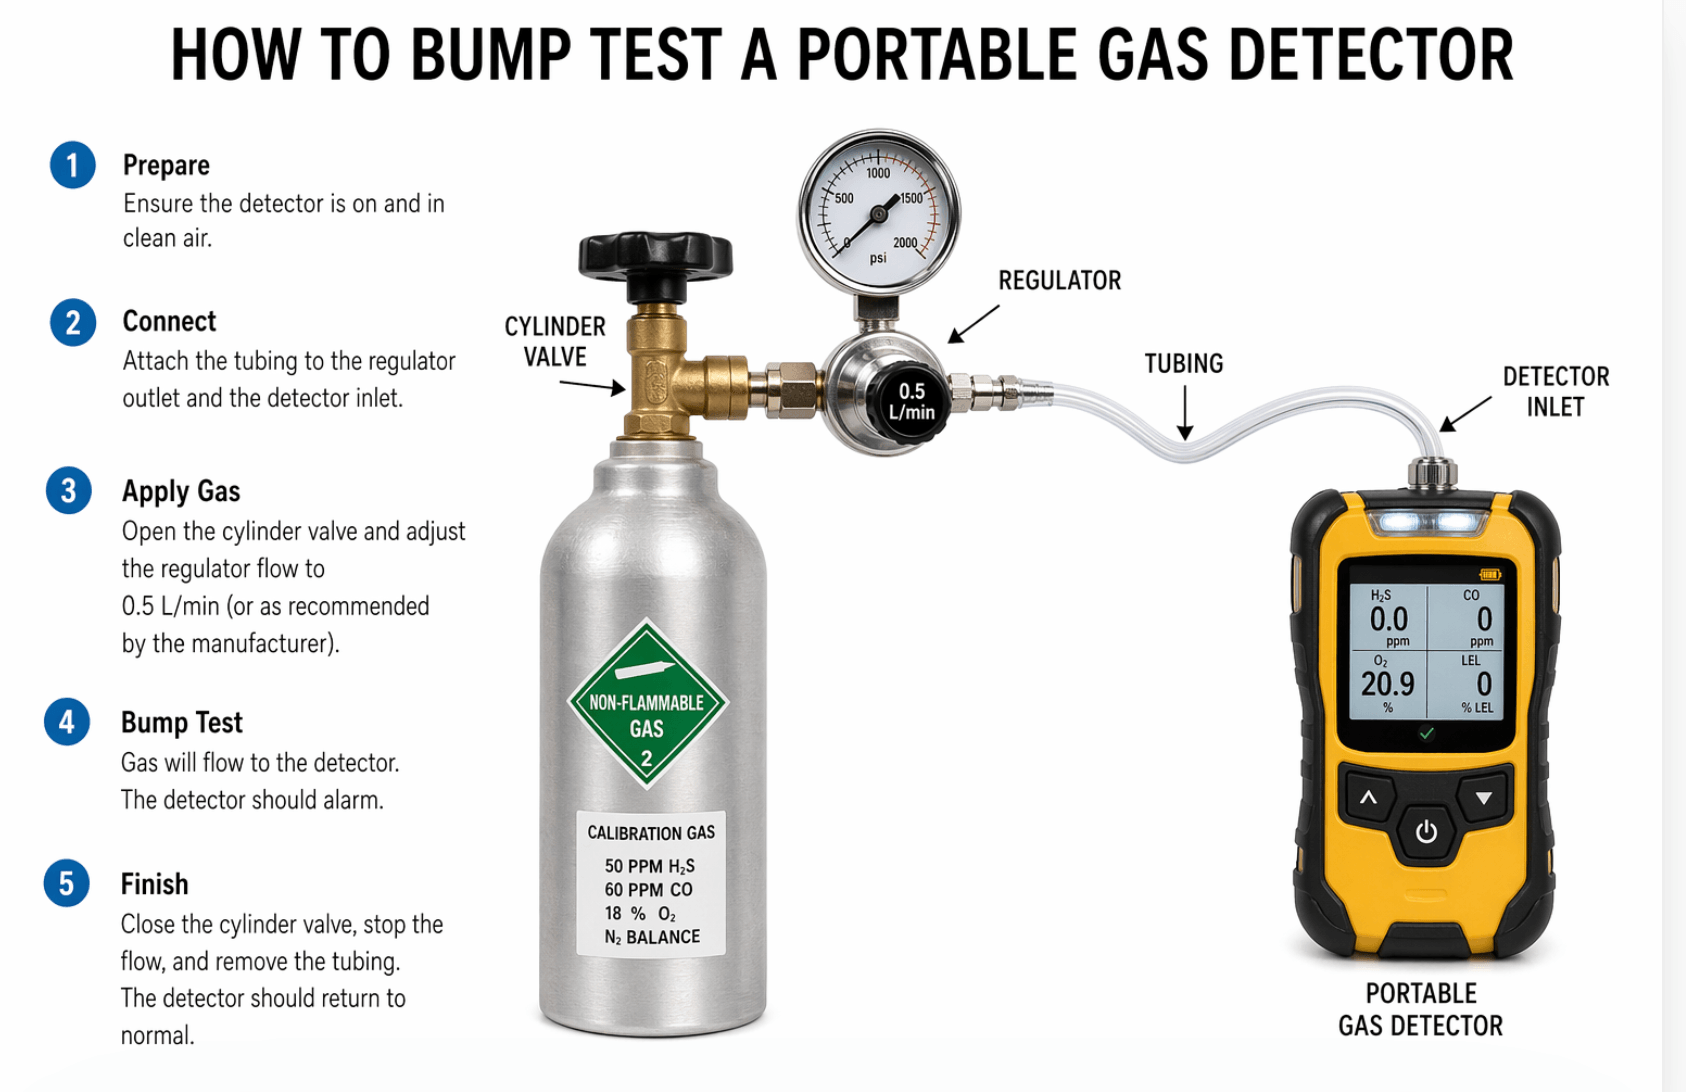
Step-by-Step Procedure
Step 1: Verify the calibration gas
Check the cylinder label. Confirm it contains the correct gas(es) at the correct concentration, and that the cylinder is within its expiration date.
Step 2: Power on the detector
Allow the instrument to complete its self-diagnostic startup sequence. Confirm there are no pre-existing fault codes.
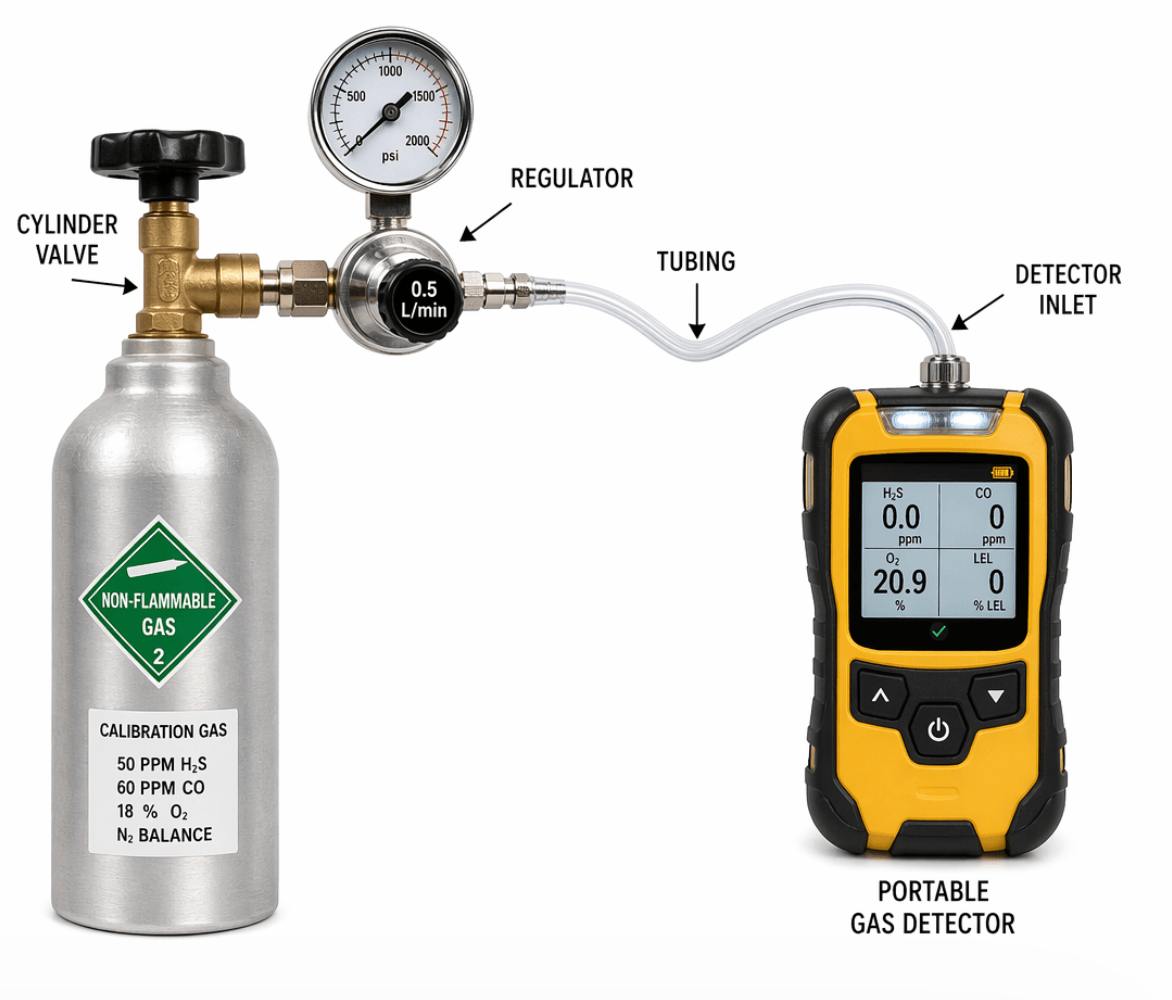
Step 3: Connect the gas
Attach the regulator and tubing or bump cap to the sensor inlet port. Do not apply gas yet.
Step 4: Apply the calibration gas
Open the cylinder valve and allow gas to flow to the sensor. For demand-flow regulators, place the cap firmly on the inlet to allow flow.
Step 5: Observe the response
Within a few seconds (typically 5–30 seconds depending on the gas and sensor type), the reading should rise, and the alarm should activate. Most instruments require the reading to exceed the low alarm setpoint.
Step 6: Remove gas and confirm sensor recovery
Close the cylinder valve and allow fresh air to flush the sensor. The reading should return to baseline (zero or ambient oxygen level).
Step 7: Record and document
Log the bump test result pass or fail along with the date, time, and instrument serial number. Many modern docking stations do this automatically.
What Gases Are Typically Used in Bump Tests?
The gas mixture used should contain the same gases your detector is configured to detect, at concentrations that will trigger the alarm. Common mixtures include.
- 4-gas mix: LEL combustibles (typically methane or pentane), oxygen (O₂), carbon monoxide (CO), and hydrogen sulfide (H₂S)
- Single-gas cylinders for detectors configured for specific hazards (e.g., ammonia, chlorine, SO₂)
- Specialty mixes for confined space entry in petrochemical, wastewater, or mining environments
The concentration in the cylinder is usually chosen to be above the low alarm setpoint but well below dangerous levels, for example, 50% LEL methane, 18% O₂, 50 ppm CO, and 25 ppm H₂S is a very common 4-gas standard.
How Often Should You Bump Test?
This is where industry guidance and regulatory standards sometimes diverge.
Industry best practice and most manufacturer recommendations: Bump test before every single use.
This is the position of organizations like the Industrial Scientific Corporation, Honeywell Analytics, and most gas detection manufacturers.
Some regulatory frameworks allow for less frequent functional testing if.
- The instrument has a documented calibration history showing consistent accuracy.
- Environmental conditions are stable and low-risk.
- The organization has a written gas detection program that justifies the reduced frequency.
However, for high-hazard environments confined space entry, oil and gas, mining, and wastewater, a pre-use bump test is the only defensible standard.
The cost of a bump test (a few seconds and a fraction of a cent worth of calibration gas) is trivially small compared to the consequences of a failed detector.
Automated Bump Testing: Docking Stations
Many modern gas detection programs use automated docking stations to perform bump tests and calibrations with minimal manual intervention.
When you dock your instrument at the end of a shift or at the start of the day, the station.
- Reads the instrument’s sensor data and history.
- Applies calibration gas and verifies sensor response.
- Performs a full calibration if the bump test result falls outside tolerance.
- Charges the battery.
- Generates a compliance report.
Popular systems include the iNet platform from Industrial Scientific, Safety Suite 2.0 from Honeywell/BW Technologies, and Galaxy GX2 from MSA.
Docking stations are particularly valuable for large fleets where manual testing of every unit every day is impractical, and where compliance documentation is required for regulatory or insurance purposes.
Bump Testing and Regulatory Compliance
Depending on your industry and jurisdiction, bump testing requirements may be embedded in.
- OSHA standards (e.g., 29 CFR 1910.146 for confined space entry in the US)
- ATEX/IECEx documentation requirements in Europe
- NFPA codes relevant to your facility type
- Manufacturer instructions, which are typically incorporated by reference into regulatory requirements
Regardless of the specific regulation, maintaining a documented bump test log is essential for demonstrating due diligence. In the event of an incident, the absence of bump test records is a significant liability exposure.
Common Bump Test Mistakes to Avoid
Using expired calibration gas
Calibration gas cylinders have a shelf life, typically 12–36 months, depending on the mixture and cylinder type. Reactive gases like H₂S degrade faster. Always check the expiration date.
Using the wrong gas concentration
If the cylinder concentration is below your alarm setpoint, the detector won’t alarm, and you may incorrectly record a fail or worse, incorrectly assume a pass if you’re not watching carefully.
Not allowing enough exposure time
Some sensors, particularly electrochemical sensors for H₂S, SO₂, or chlorine, respond more slowly than LEL catalytic bead sensors. Allow adequate exposure time per the manufacturer’s guidelines.
Skipping the recovery check
Always confirm the sensor returns to baseline after removing the gas. A sensor stuck at an elevated reading or one that drops to zero suspiciously fast may indicate a sensor problem.
Not documenting results
A bump test that isn’t recorded might as well not have happened from a compliance standpoint.
When a Bump Test Fails: What to Do
If a detector fails a bump test, meaning it doesn’t respond to gas, doesn’t alarm, or doesn’t recover to baseline, remove it from service immediately.
Next steps typically include.
- Perform a fresh full calibration and repeat the bump test.
- If it still fails after calibration, inspect for physical damage, sensor poisoning, or a blocked inlet.
- Replace the sensor if indicated.
- Contact the manufacturer or authorized service center if the cause is unclear.
- Document the failure and resolution in your maintenance log.
Never return a failed instrument to service without confirming the issue has been resolved, and a successful bump test has been completed.
Key Takeaways
- A bump test is a quick, qualitative verification that a gas detector’s sensors and alarms are functioning.
- It is not the same as calibration; it doesn’t correct sensor readings.
- Bump tests should ideally be performed before every use in high-hazard environments.
- The test requires a calibration gas cylinder with a concentration above the alarm setpoint.
- Document every test pass or fail for compliance and liability protection.
- Automated docking stations can simplify bump testing at scale.
- A detector that fails a bump test must be removed from service until resolved.
Final Thoughts
In industrial safety, the instruments we rely on are only useful if they actually work. A bump test is your daily handshake with your gas detector, a simple, fast confirmation that it’s ready to protect you.
If you’re building or reviewing a gas detection program, make the pre-use bump test non-negotiable. The procedure takes under a minute. The consequences of skipping it can be permanent.